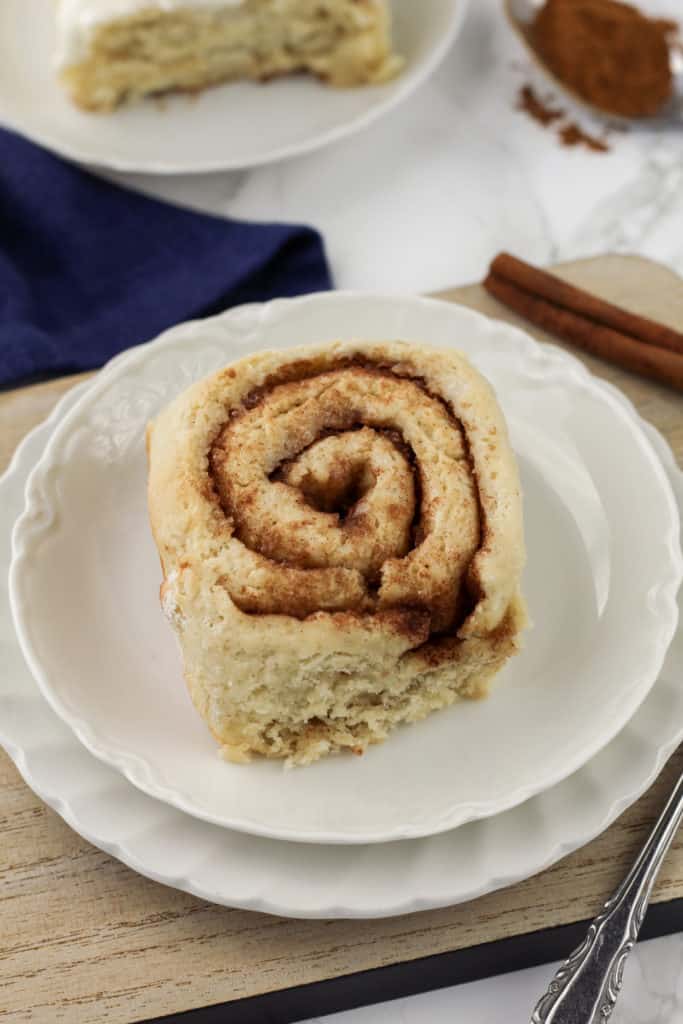
Classic cinnamon rolls, made gluten-free, with pull-apart edges and a soft cinnamon sugar center. Even without gluten, with the right tips you can make some delicious cinnamon rolls!
Is your family known for a recipe?
Maybe there’s one you make for every Holiday? Pot luck? Or something traditional with roots to your heritage?
For my family, it’s cinnamon rolls. For whatever reason, years ago, my Mom made it her mission to make the best cinnamon rolls, ever. Perhaps more like sticky buns mixed with cinnamon rolls – my Mom’s have a caramel pecan bottom underneath the cinnamon rolls, and cream cheese frosting on top. They’re insanely decadent and glorious.
On Sunday’s after Church we would have friends over a fair amount. And chances are there were cinnamon rolls somewhere. Company spent the night? Cinnamon rolls. Holidays? Cinnamon rolls… You get the picture.
My Mom made a name for herself for her cinnamon rolls.
After I went gluten-free (almost 8 years ago!) I longed for one. My Mom tried to replicate her recipe with gluten-free flour and it just never turned out the same.
Thankfully, all purpose gluten-free flour blends have gotten much better over the years. Also, I’ve picked up some tips along my gluten-free journey. I’m beyond excited to share them, with all of you, and hope you enjoy this recipe as much as I do.
I took my favorite parts of my Mom’s cinnamon rolls, as well as my tips and tricks, and created these gluten-free Cinnamon Rolls.
Truthfully, they aren’t the same as cinnamon rolls with gluten.
And they never will be. You just really cannot imitate the glorious stretch that gluten gives a bread. But, these are seriously the next best thing. I LOVE them.
They’re definitely the best gluten-free Cinnamon Rolls I’ve ever eaten! The strips of soft dough with pops of cinnamon sugar and cream cheese frosting across the top… I mean c’mon!?
If you haven’t found “the” recipe for gluten-free Cinnamon Rolls, I hope this one finds it’s way to you and does the trick.
Where to begin?!
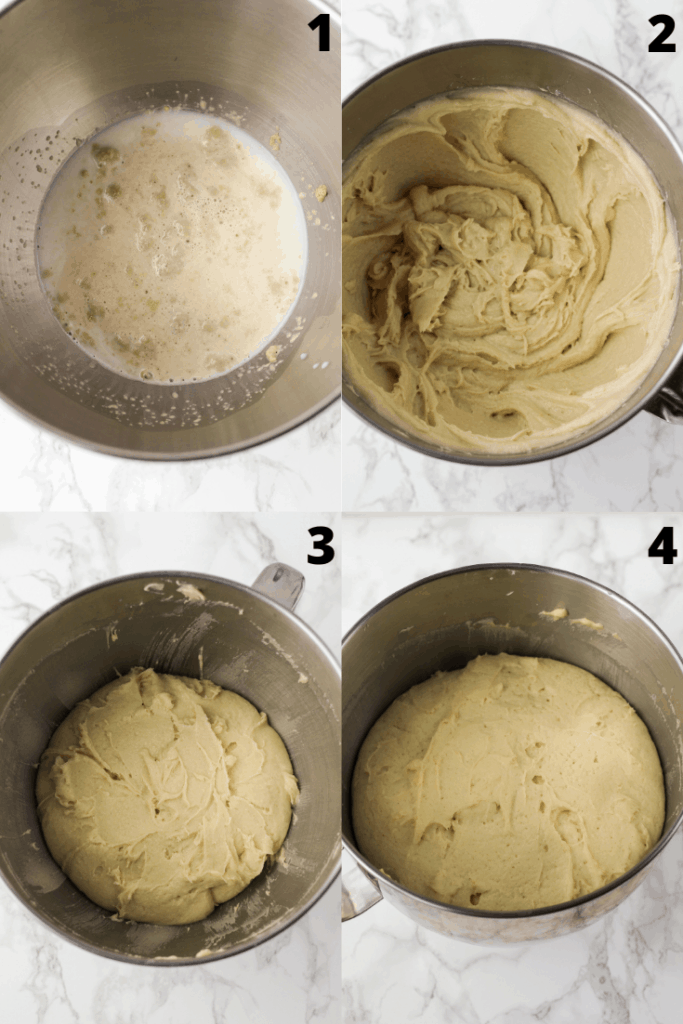
First, let’s start with making the dough. In typical cinnamon roll dough fashion you’ll add a little sugar, yeast and warm milk together. The milk CANNOT be too hot, or it will kill the yeast. I like to use my meat thermometer to be sure it’s about 105 degrees.
That will set for about 5 minutes or so, and bubbles should form (pictured above, #1). Next, you’ll add the rest of your sugar, eggs and butter and mix them in briefly. Then you’ll add your gluten-free all purpose flour and salt (start your mixer on low, and work your way up to number 6 setting on a Kitchenaid).
One trick: Using less gluten-free flour in place of regular flour helps to get the correct dough texture. It makes the dough trickier to work with, so have a little extra patience.
You’ll beat everything together for about 5 minutes on setting 6 (picture #2). The dough should be sticky yet thick, where it’s sticking to the sides of the bowl but can easily be scraped down.
Scoop your dough into another large mixing bowl (that’s been sprayed or oiled heavily) and using a spatula push it into a ball (picture #3). Cover it with a towel. Let your dough rise for about an hour in a warm spot.
Another trick: Don’t have a warm spot? Heat your oven to the lowest temperature it can go, while you make the dough (mine is 170 degrees). After it’s ready, turn it off. Place your bowl of dough into your oven (you can leave the door partially opened if it’s too warm).
After about an hour it should be about double it’s size (picture #4).
Now let’s roll out the dough.
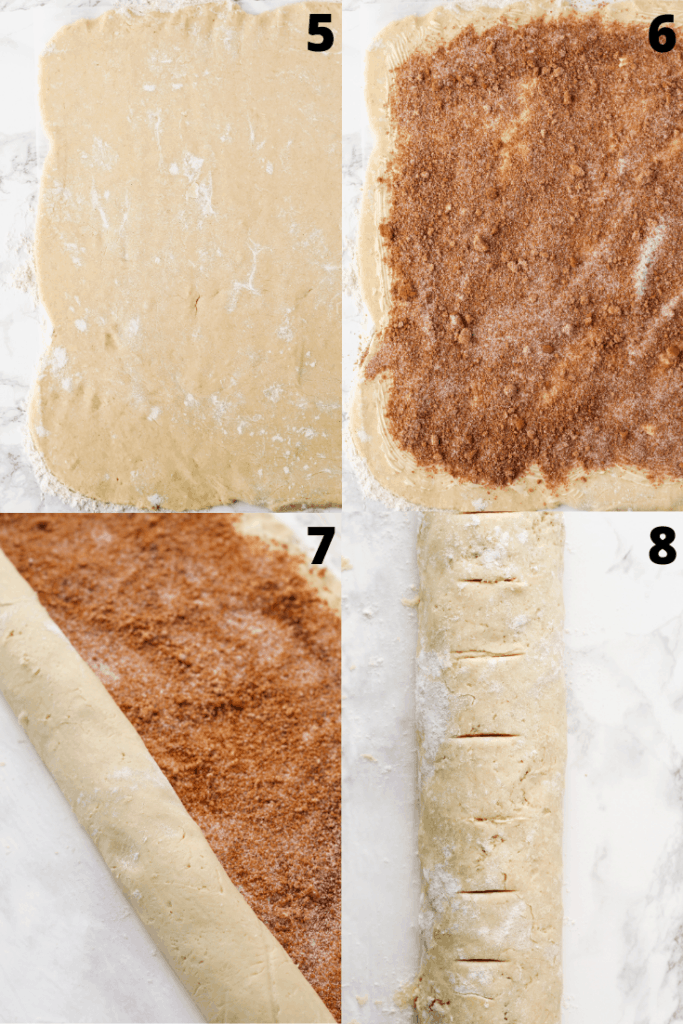
Next trick: Prepare a large piece of parchment paper on your counter (about 12″x24″). Using parchment paper as your leverage to help roll your dough up is SUPER important. Or, your dough will stick to the counter and you’ll have a mess.
Generously sprinkle flour across your parchment paper. Scoop your dough out onto your parchment paper and sprinkle more flour across the top. Using a rolling pin, gently roll the dough out to cover the whole parchment paper. Sprinkle more flour in between rolling, if necessary (or your dough may stick to your rolling pin).
Next, the melted butter! Drizzle that across your dough and gently spread it out, covering all of the dough till about an inch from each edge. Be careful not to push into your dough.
In a small mixing bowl, combine your white sugar, brown sugar and cinnamon and stir them together well. Sprinkle the cinnamon sugar mixture across your dough, leaving an inch of space by each edge bare (just like the butter). Gently pat the cinnamon sugar into place.
Take a deep breath, you’re going to roll your cinnamon rolls up.
(Starting from the long 24″ end) Using the parchment paper, slowly pull it up, to get the first edge of the rolls up. Let go of the parchment paper and gently use your hands to tuck the roll into place even more. Continue to slowly pull up the parchment roll a little bit at a time, stopping in between to adjust your roll if necessary (you can try and gently pull the roll towards you in between to make the rolls tighter). Roll until you have one giant cinnamon roll log.
Using a knife, gently make indents about 2 inches apart, evenly spacing it into 12 cinnamon rolls.
Prepare a 9×13 pan with parchment paper and non-stick spray (the best way to be sure you don’t have cinnamon rolls stuck to the pan!).
Now we have to cut them. This is the part I always dread because it can easily be a mess.
Another trick: use floss. I know, it’s weird. Your kids will laugh at you. but it works beautifully and gives you show stopping gluten-free Cinnamon Rolls every time.
How? Take a large piece of floss and wiggle it under your cinnamon roll log, till it’s under your first indent. Bring the ends of the floss up and over the cinnamon roll, and cross them. Pull them away from each other quickly. They will “cut” the cinnamon rolls for you very clean. Cool, right?
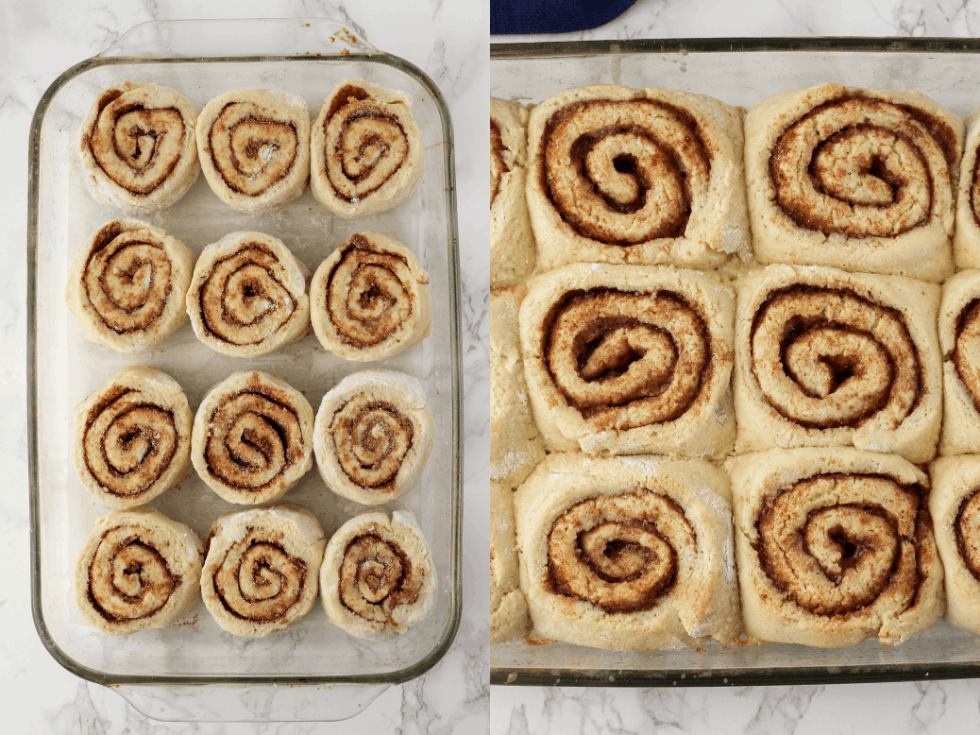
Now, very gently lift the cinnamon roll off the parchment paper and into your prepared pan. I recommend using a small stainless steel spatula (that’s been sprayed with non-stick spray) to help remove the cinnamon roll from the parchment paper, if you need it. Repeat till all 12 cinnamon rolls are in the pan.
Cover and let rise for another 30 minutes.
Now, it’s about time to bake!
One last trick (I picked this one up from this blog). Do you like more doughy cinnamon rolls? I don’t, but my husband does. Take 1/4 cup of warm heavy cream and brush it around your cinnamon rolls gently and drizzle it across the tops, just prior to baking.
It’s not necessary by any means, and can be done for gluten-free cinnamon rolls or not. It’s just a fun tip for an even more soft and doughy roll.
Then bake at 350 for about 18-25 minutes. I recommend carefully using your finger to push into the dough a touch (the center of one roll), to see if it feels more firm rather than doughy.
Last but not least: cream cheese frosting.
I recommend adding the cream cheese frosting while your cinnamon rolls are still warm. This way the frosting will melt a little and be easier to spread.
If you prefer, you could also use a vanilla icing on top instead. I love them that way too, but I think my husband would say that’s blasphemy! 😉
Whatever frosting you like, go for it. I make a half batch of frosting, which I think is plenty, but if you like tons of frosting then go ahead and double my recipe.
Now serve, and devour. With a little patience and gentle hands, you’ve got a pan full of delicious. Enjoy a warm gluten-free cinnamon roll. You’ve earned it.
One last thing: I use King Arthur Measure for Measure flour with these, which is what I recommend you use too! If you use another gluten-free all purpose flour blend I cannot guarantee it will work in this recipe. I would assume that Bob’s Red Mill 1-to-1 would also work in this recipe, as I use that flour sometimes too when I bake.
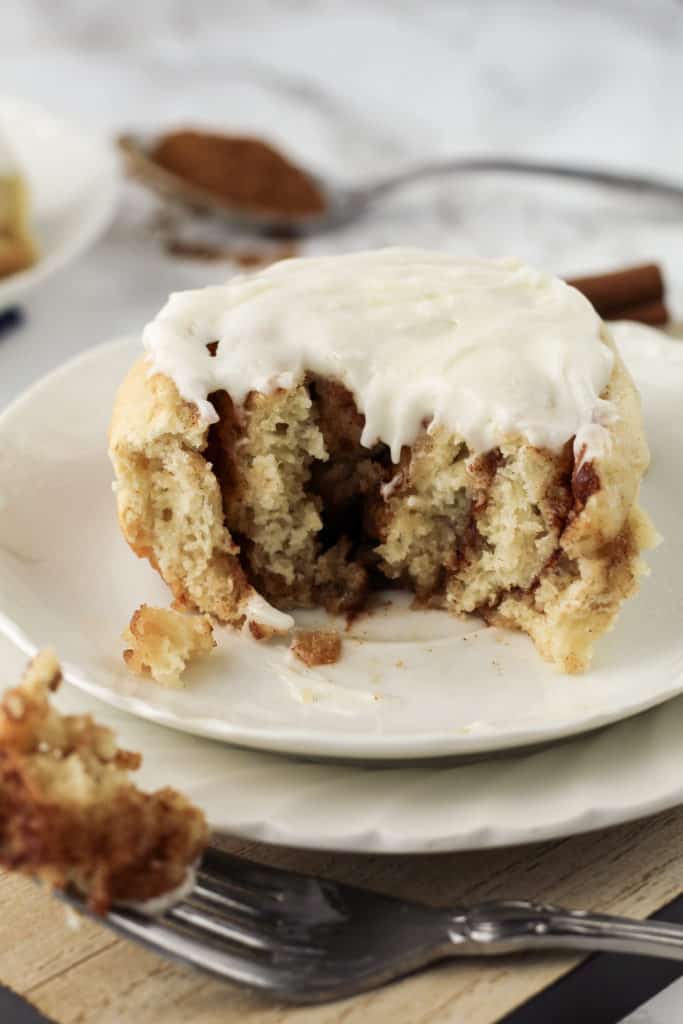
Drool! If you’re like me, you’ve been waiting for THE best gluten-free Cinnamon Roll recipe for years. After several test rounds over the years, I’ve finally got my winning recipe.
I hope you all enjoy these as much as I do, and they turn out well for you! Let me know with a comment and rating, below, or find me on Instagram and tag me.
Other classic gluten-free recipes you may want to check out while you’re here: Vanilla Cupcakes, Chocolate Cupcakes, and Chocolate Chip Cookies.
- 1 tbsp sugar
- 1 tbsp yeast
- 1 cup warm milk (about 105 degrees)* (whole, 2% or almond milk)
- 1/2 cup white sugar
- 2 eggs
- 6 tbsp butter, melted (room temperature) (or dairy-free butter alternative)
- 3 3/4 cups gluten-free all purpose flour, King Arthur Measure for Measure
- 1 tsp salt
- 1/2 cup white sugar
- 1/2 cup brown sugar
- 2 tbsp cinnamon
- 6 tbsp butter, melted (or dairy-free butter alternative)
- 1/4 cup heavy cream, warm (or coconut milk) (optional)
- 4 oz cream cheese (or dairy-free cream cheese)
- 2 tbsp butter, softened (or dairy-free butter alternative)
- 2 cups powdered sugar
-
To begin, add 1 tbsp of sugar and yeast to a large mixing bowl in a stand mixer. Add your milk and whisk in. Let the mixture set for about 5 minutes, for the yeast to bubble.
-
Add your 1/2 cup of sugar, eggs, and butter, and whisk them into the mixture briefly. Add your flour and salt, starting on low, mix together. Bring to a medium mixing speed (or 6 on a Kitchenaid) and beat for 5 minutes (stopping to scrape down the bowl occasionally).
-
Spray another large mixing bowl with non-stick spray, or oil thoroughly. Scoop your cinnamon roll batter into the middle of the bowl, forming one large dough ball together carefully. Cover and let rise for about an hour in a warm place, or till the dough has about doubled in size.
-
To a small mixing bowl, add your white sugar, brown sugar and cinnamon and mix together till well combined.
-
Prepare a 9×13 pan with non-stick spray and parchment paper on the bottom.
-
Place a large piece of parchment paper on your counter (about 12×24"). Sprinkle flour across generously. Place your dough onto the parchment paper. Sprinkle more flour across the top of the dough, so it doesn't stick to your rolling pin. Roll the dough out to cover the entire piece of parchment paper, occasionally sprinkling more flour across the top if needed.
-
Drizzle the melted butter across the top of your cinnamon roll dough, and spread it out till it's evenly covering the whole surface of the dough (leaving about an inch around the edges of the dough without). Sprinkle the cinnamon sugar mixture across the butter. Gently press it into the butter.
-
Using your parchment paper to help, very carefully lift the edge of the paper and start to roll the edge of the cinnamon roll up with it. Tighten the roll with your hands carefully if necessary. Continue to use the parchment paper to pull up and roll the cinnamon roll together, till it's entirely rolled and has formed one cinnamon roll log.
-
Using a knife, carefully and evenly mark 12 cinnamon rolls along the log (about 2" thick each). Either using a sharp knife (sprayed with non-stick spray) or floss, cut each cinnamon roll off the log. Gently remove the cinnamon roll from the parchment paper, and place it in the pan in rows of 3×4.
-
Cover your pan and let rise again for about another 30 minutes. Preheat your oven to 350.
-
(Optional) Gently brush each roll with the heavy cream, and drizzle some across the tops. This will make your cinnamon rolls more dough-y in texture.
-
Bake in the oven for 18-25 minutes. *If you added the heavy cream drizzle, the rolls may take longer to bake.
-
To a large mixing bowl, add your butter and cream cheese and cream them together with a hand mixer. Add your powdered sugar, a cup at a time, and blend till smooth.
-
Gently spread across the tops of your cinnamon rolls while they are still warm.
-
Devour!
*Your milk must NOT be too hot, or it will kill the yeast.
**Stored in an airtight container in the fridge, these taste best within the first three days. I recommend covering them with a damp paper towel and microwaving them for about 20 seconds to reheat them.

Total disaster. Are you sure this is for King Arthur “Measure for Measure” flour, which specifically says “not recommended for yeasted recipes” on the package? My dough looked nothing like this and was a sticky, gloppy, completely unworkable mess.
Do you use the whisk attachment on your kitchen aid mixer for the dough?
Hi Leah. I use the paddle attachment.
Hello!! I am going to make your recipe for Christmas morning. Looks amazing! I am wondering if I could make the dough, roll them out and put them in the 9 by 13 pan tonight and then bake first thing in the morning? Save some time in the morning. Thank you!
Hi Christina. Sorry I didn’t see the message sooner. I haven’t done that before with this recipe, but I think it would work (just let them come to room temp first before baking).
Need to try these out. Love they are gf with a df option.
These were amazing!! My DIL is GF and lives in Denver. I’ve been trying to bake for her when I come to visit. She asked for cinnamon buns and I found your recipe. I made one change—I used KA bread GF a flour. They turned out amazingly fluffy and tasty. Thank you for this recipe because trying to bake in the mile high city is challenging.
Do you think I can use sourdough discard instead of yeast?
Hi there. I wouldn’t risk it with this recipe. Sourdough discard may not give enough rise to the rolls, and I’d hate for you to go through all that work for them to not be fluffy enough.
I used the flour you recommended, and they turned out great! This was my first attempt at a gluten-free recipe with yeast, and I was surprised by how easy it was. My husband says they taste like Cinnabon. Yum!
SO great to hear, thanks for the comment Amber!