
No spread, easy, gluten-free Chocolate Cut Out Cookies are a must-have recipe during the Holidays. The added cocoa powder and chocolate icing are a fun twist on classic Sugar Cookies that you won’t be able to get enough of!
Is there anything better than chocolate?
Not much. 🙂
A couple years ago my Mom made some Chocolate Cut Out Cookies for my son’s birthday party and they were delicious, a total hit. Of course, I knew I had to make my own version then! So I took my Gingerbread Cut Out Cookies, and turned them chocolate.
It doesn’t get much better than this folks.
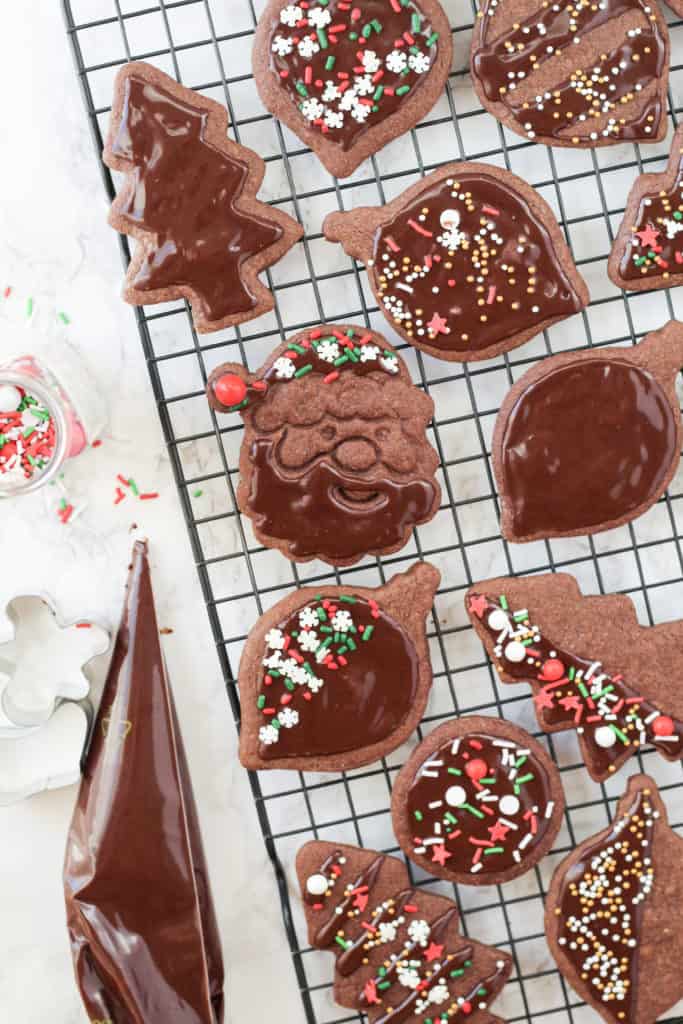
These gluten-free Chocolate Cut Out Cookies are filled with rich chocolate flavor, and they have crispy edges and soft centers. Plus they’re topped with a chocolate icing that dries hard.
They’re the perfect Holiday cookies to make to decorate together as a family. Bring on the Christmas music, hot chocolate, fire, and sprinkles!
Plus, these no spread cookies work beautifully if you bake at high altitude as well.
Forget about plain ole sugar cut out cookies, and instead give these Chocolate Cut Out Cookies a try this year!

A couple important Cookie Tips…
First, to make these gluten-free I recommend using a gluten-free all purpose flour blend. However, if you don’t need them to be gluten-free you can use regular white flour as well.
Next, be sure to sift your cocoa powder while adding it to your bowl. The last thing you want in your cookie batter is chalky cocoa powder clumps. I recommend using a fine mesh strainer, like these. I use mine all the time!
Other than that, these Chocolate Cut Out Cookies are made just like any other cookie dough batter. With simple ingredients like butter, white sugar, vanilla, an egg, gluten-free flour, baking powder, salt and cocoa powder.
So the dough is easy enough, but what about the cut out’s?
Most importantly, after making the dough it’ll chill for at least two hours wrapped in saran wrap in the fridge. This is really a must-have, or the dough will be too soft to work with and your cut out’s will not work well at all.
After chilling, you’ll place your dough onto a well-floured counter, to roll it out with a rolling pin.
I recommend consistently sprinkling the top of your dough with a little flour, every 3-4 rolling pin rolls. This will help the dough to not stick to the rolling pin.
After you’ve rolled your dough out to about 1/4 inch thin, it’s time to start punching some shapes out!
Push your cookie cutter into the dough and pull it back out. If your cookie came up inside the cookie cutter, go ahead and gently push it out onto a baking sheet. If it did not, I recommend using a thin metal spatula to very quickly and firmly slide under the cookie. Then, you can gently slide the cookie off onto your baking sheet.
Continue until you’ve cut out as many cookies as you can.
Place cookies that are similar in size on the same baking sheets, so they bake correctly. If you have small cookies on the same pan as large cookies, your small cookies will over cook and your large cookies will be under done.
You can gently re-work the leftover dough edges together (placing more flour on your counter and sprinkling more across the top of your dough). Roll it out again and cut out more cookies. I would recommend doing this no more than two times (or the dough will start to get too soft and be hard to work with).
Then, after baking and cooling, it’s time to decorate!
You can use whatever frosting and sprinkles you want with these cookies.
I’ve included a recipe for a simple chocolate icing, that dries hard. It’s ideal for cookie decorating, if you want to make the prettiest chocolate cookies that you can!
Otherwise, a chocolate buttercream frosting (homemade or from a jar) would work great as well.
Then sprinkle away to your hearts content, with Christmas Classics blasting in the background!
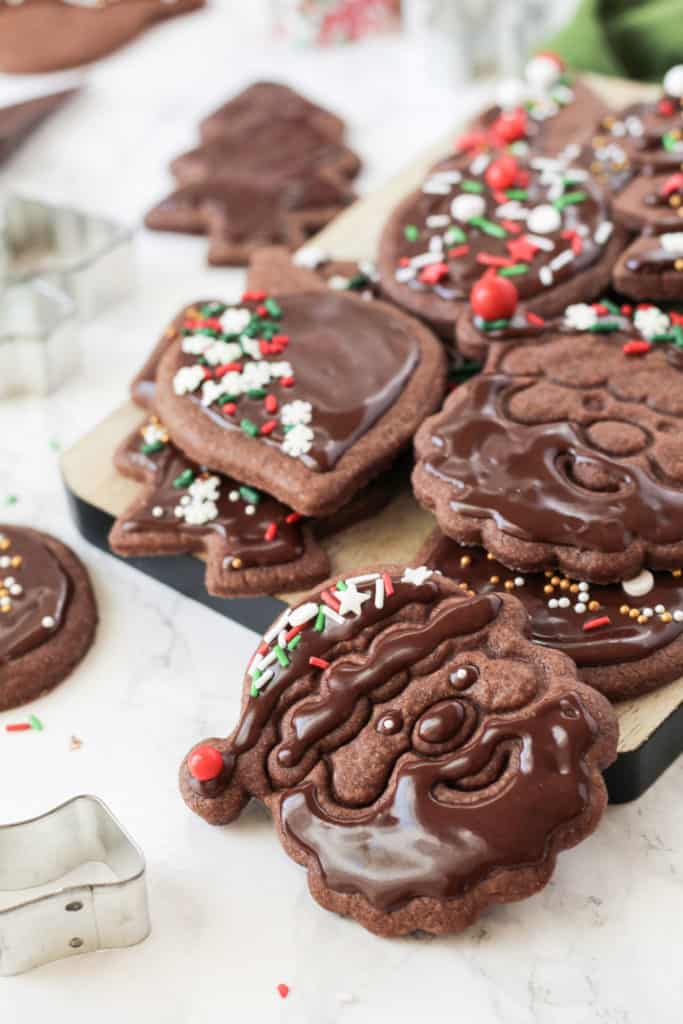
These gluten-free Chocolate Cut Out Cookies are simple to make, no spread, filled with chocolate flavor, and so much fun to decorate for the Holidays.
After you make them, let me know what you think! Did they turn out well for you? Leave a comment/rating, below, and/or find me on Instagram and tag me in a picture of your cookies! I love to see it.
Need more Christmas Cookie inspiration before you go? Be sure to check out my gluten-free Chocolate Peppermint Cookies, Almond Flour Shortbread Cookies and Gingerbread Oatmeal Cookies.

- 1/2 cup butter, softened
- 3/4 cup white sugar
- 1 tsp vanilla
- 1 egg
- 1 1/4 cups + 3 tbsp gluten-free all purpose flour (or regular flour)
- 1/2 tsp baking powder
- 1/4 tsp salt
- 1/3 cup cocoa powder
- 1 1/2 cups powdered sugar
- 1/4 cup cocoa powder
- 2-3 tbsp water
- 1 tbsp corn syrup
- 1/2 tsp vanilla
-
To a large mixing bowl, add your butter and white sugar and beat them together with a mixer till creamy. Add your vanilla and egg and briefly blend in.
-
To the same bowl, add your flour, baking powder and salt. Add your cocoa powder through a fine mesh strainer. Stir together till everything is combined and you have a thick, smooth cookie dough batter.
-
Place a large piece of saran wrap on your counter and put your cookie dough in the middle in one ball. Gently push your dough into a flat, disc-like shape (so it's easy to roll out later). Wrap the saran wrap around the dough till it's covered entirely. Place in the fridge and chill for at least 2 hours.
-
After 2 hours, remove your dough from the fridge. Preheat your oven to 350. Spray two pans with non-stick spray (or line with parchment paper).
-
Using a large spot on your counters, sprinkle flour across the tops so your dough won't stick. Unwrap your dough and place it on the counter. Sprinkle a little more flour across the top of the dough, to prevent it from sticking to your rolling pin.
-
Roll your dough out to about 1/4 inch in thickness, all around. Continue to sprinkle a little more flour on top so it doesn't get too sticky.
-
Using a cookie cutter, cut the dough into shapes. Use a thin spatula to remove the cookie cutouts and place them on your pans. I recommend placing similarly sized cookies on the same pan, so the cookies bake evenly.
-
Bake for 7-12 minutes (depending on the size of your cookies), or till the edges are set and the cookies are cooked through. Smaller cookies will take about 7-8 minutes, medium cookies about 8-10, and large cookies about 10-12 minutes.
-
With the leftover cookie dough, you can push it together (forming another disc) and re-roll it with your rolling pin. Be sure to use flour on your counters again and on top of the dough. Continue till you've cut out as many cookies as you can!
-
After your cookies have cooled entirely, frost and decorate them.
-
To a small mixing bowl, add your powdered sugar and cocoa powder and whisk them together till well combined. Add 2 tbsp of water, corn syrup and vanilla and continue to whisk till you have a thick, smooth icing. Add another tbsp of water if necessary.
-
Spread or pipe onto cookies, add sprinkles, and enjoy!
Stored in an airtight container, these cookies last about a week.
This recipe is sooo good! My cookies turned out amazing!! I dipped them in melted white chocolate. Next batch I might try out your icing recipe. Thanks a latte!!
Hello can I do this recipe with coconut sugar instead of white sugar?
Hi Ivriana. I would think these would work okay with coconut sugar, but you may want to use a touch less (like a couple teaspoons less) since coconut sugar is closer in texture to brown sugar (and has more moisture than white sugar).