
Tender, fluffy gluten-free Pumpkin Scones with a chocolate glaze are such a fun Fall breakfast treat. These make a great Holiday breakfast or brunch too!

Pumpkin Scones are my favorite type of scone. Ever.
Pumpkin puree gives the scones the perfect amount of extra moisture (that also holds its structure well), so they’re nice and tender.
My gluten-free Pumpkin Scones are made easy with simple ingredients: gluten-free all purpose flour blend, brown sugar, pumpkin pie spices, pumpkin puree, milk, an egg, and butter.
Many people like to top Pumpkin Scones with a more Fall-flavored glaze (think maple, cinnamon, chai, pumpkin pie spice, etc.). I wanted to do something a little out of the box though.
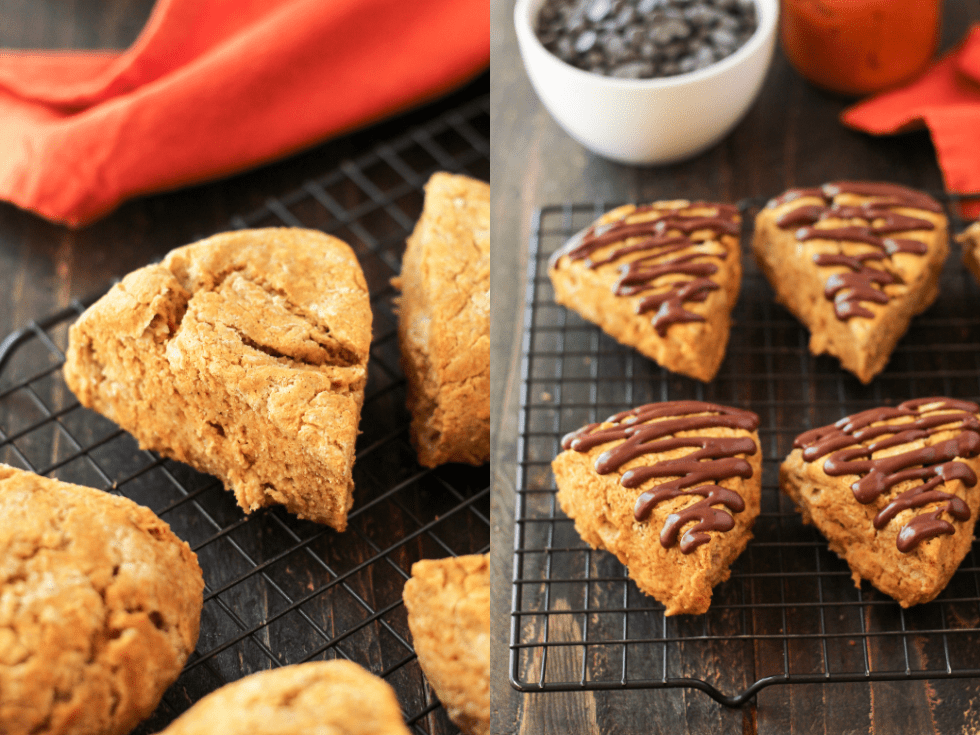
Because what goes better with pumpkin than chocolate?! So why not a CHOCOLATE GLAZE?
Turns out, it was a GREAT decision. It adds a hint of chocolate and sweetness, without an overbearingly sweet flavor. Which, in my opinion, is just how a great Scone should taste.
Of course, my kids went crazy for these too (because what kid doesn’t love a chocolate glaze?! Heck, what adult doesn’t love a chocolate glaze!?). 🙂
So, who’s ready to make some gluten-free Pumpkin Scones with a chocolate glaze?!
Let’s talk about how to make Scones first.
To make the best gluten-free Pumpkin Scones, first you’ll want to whisk together all of your dry ingredients (flour, brown sugar, baking powder, pumpkin pie spice, and salt).
Don’t preheat your oven, YET.
Next, in another bowl you’ll whisk together your wet ingredients (pumpkin puree, milk, and egg) till smooth.
Here’s arguably the most important step now: cutting your butter up. You’ll want to cut it up into pea-sized chunks, as small as you can get them. Add them to your dry ingredients, and be sure each butter chunk is coated in the dry ingredients (and not sticking together). I like to use my hands to make sure the butter isn’t clumped together.
Add your wet ingredients to your dry ingredients (and butter), and stir together till you have a “shaggy dough.” Which means, the dough will still not be fully formed yet.
Put a piece of parchment paper (about the size of your pan you’ll be baking your scones on) on the counter. Dump your “shaggy” scone dough onto it. Gently work it into a well formed dough, and form it into a disc-shape (about 1-1 1/2 inches tall). Then carefully move your parchment paper and scone dough onto your pan.
Use a sharp knife, and cut through the scones to form 6 or 8 scones. I prefer to make 6 larger scones. Then, I recommend using a metal spatula (sprayed with non-stick spray) to gut underneath and separate the scones so they are about 1-2 inches apart from each other. They need a little room to spread in the oven and cook evenly.
BUT you can’t bake your gluten-free Pumpkin Scones just yet!
Put them in the fridge to chill for at least 15 minutes (or even longer, if you’d like to make these ahead of time and bake them later). Now, you can preheat your oven to 400 while you wait.
Scones have to have butter that’s as cold as possible so it stays in the dough, instead of it rapidly melting out of the sides. The butter is the key to a fluffy, delicious scone.
Let’s talk about that chocolate glaze too!
Once your scones have baked and cooled, you’ll want to make your glaze. It’s super quick and easy to make. You’ll simply whisk together your powdered sugar, cocoa powder, milk and vanilla till smooth. This recipe is for a very thick chocolate glaze, that you can pipe evenly across the tops.
Alternatively, you can add more milk (1 teaspoon at a time) for a thinner glaze, that you can easily drizzle across the entire top of the scones.
Want even more chocolate flavor? Feel free to add about 1/3-1/2 cup of mini chocolate chips to the dough when it’s at it’s “shaggy dough” stage. Talk about taking pumpkin chocolate chip to the next level!

Tender, fluffy Pumpkin Scones with a thick, lightly sweet Chocolate Glaze are such a fun treat. These make a great Thanksgiving breakfast or brunch recipe too!
After you make these gluten-free Pumpkin Scones, let me know what you think! Who else thinks Pumpkin scones are the best?! Leave a comment and rating, below, and/or tag me in your picture on Instagram. I love to hear from ya’ll!
Need more gluten-free Fall breakfast recipes? Check out my Baked Pumpkin Apple Donuts, Cinnamon Sugar Drop Biscuits and Pumpkin Spice Latte Bread.

- 2 cups gluten-free all purpose flour (or regular flour)
- 1/4 cup brown sugar
- 1 tbsp baking powder
- 2 tsp pumpkin pie spice
- 1/2 tsp salt
- 1/2 cup pumpkin puree
- 1/4 cup whole milk
- 1 egg
- 1/3 cup butter
- 1/2 cup powdered sugar
- 1 tbsp cocoa powder
- 1 tbsp milk
- 1/2 tsp vanilla extract
-
In a large mixing bowl, add your flour, brown sugar, baking powder, pumpkin pie spice, and salt and whisk together till combined.
-
To another bowl, add your pumpkin puree, milk and egg and whisk together till smooth.
-
On a cutting board, cut your butter into small, pea-sized chunks and add them to your bowl of dry ingredients. Stir them into your dry ingredients, till they're well incorporated.
-
Pour your wet ingredients over your dry ingredients and mix till you have a shaggy dough (it will still be a little crumbly).
-
Put a piece of parchment paper on your counter. Dump the scone dough onto the parchment paper and work the dough lightly till you can form a smooth disc shape (about an 1-1 1/2 inches tall). Carefully move the parchment paper (and scone dough disc) onto a pan.
-
Use a large, sharp knife, and cut the scones into either 6 or 8 wedges (I prefer 6 large scones). Using a spatula, gently move the scones so they are 1-2 inches apart on the pan. Place in the fridge for 15 minutes.
-
Preheat your oven to 400.
-
Bake the scones in the oven for 15-17 minutes, or till the top is fairly solid to touch (not mushy) and a toothpick inserted comes out clean.
-
To a small bowl, add your powdered sugar and cocoa powder and whisk them together till well combined. Add your milk and vanilla and whisk till you have a very thick glaze. If you would like it to be thinner, you can keep adding 1-2 tsp's of milk till it reaches your desired consistency.
-
Pipe (or drizzle, if thinner) on top of your cooled or warm (not hot!) scones. Devour!
Stored in an airtight container at room temperature these taste best within 1-2 days. Or, store them in the fridge for about a week.
These are delicious & moist! When I’ve made GF scones in the past they seem to be too crumbly & dry. I believe the addition of the pumpkin purée in this recipe is what makes them perfect! My non gluten free family & friends had no idea they were GF! This recipe is simple to follow & since I almost always have all of the ingredients on hand, I will definitely make them again!
Thank you, Shelly! I love hearing that they didn’t know they were gluten-free, that’s awesome! 🙂